How to Remove Cashmere Pilling (Step-by-Step Guide) | Keep Cashmere Like New
Learn how to remove pilling from cashmere with expert techniques. Discover when to use a cashmere comb or fabric shaver, step-by-step methods, and tips to keep your garments looking pristine for years.
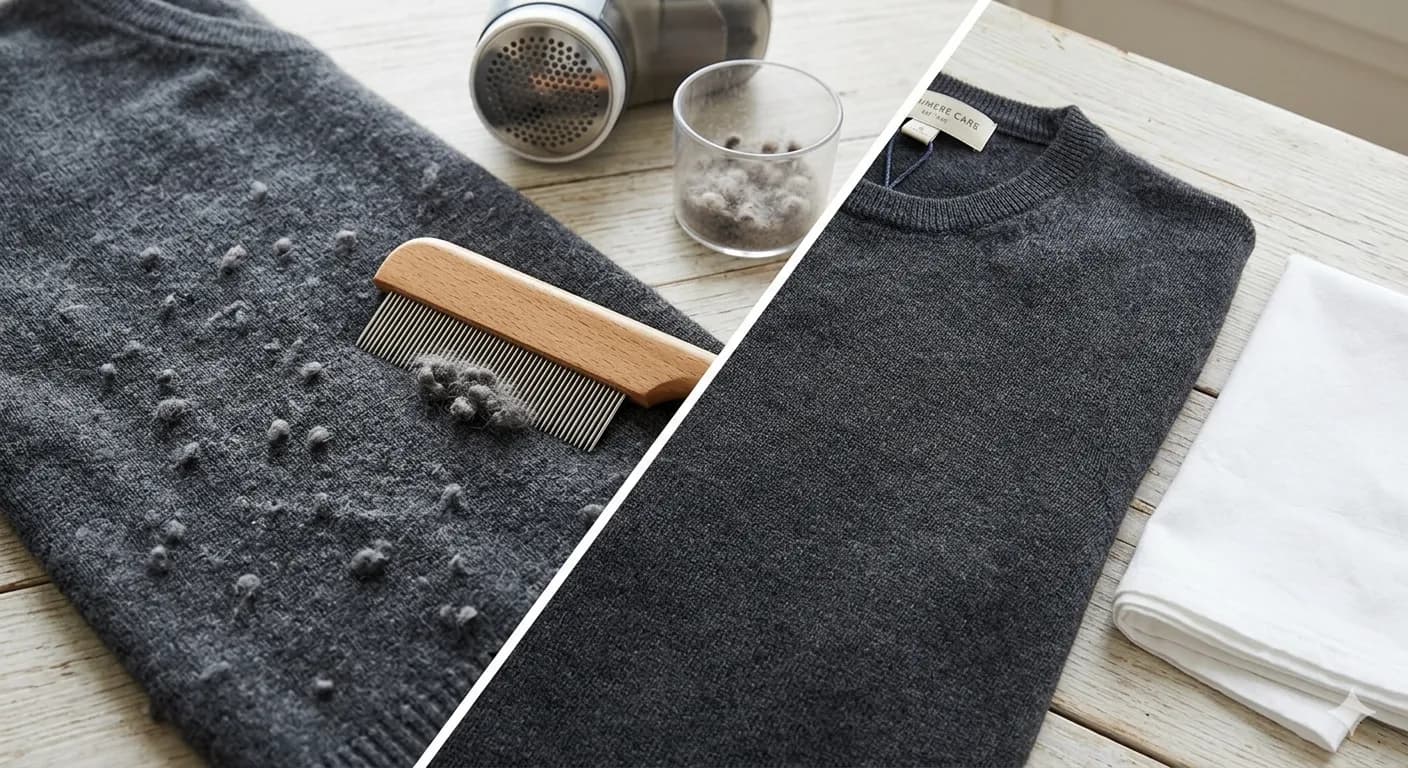
How to Remove Cashmere Pilling
The Five-Minute Skill That Keeps Cashmere Looking Pristine
Cashmere pilling is inevitable. Every fine natural protein fibre generates surface pills under friction, and no amount of careful wearing or careful washing eliminates this. What separates cashmere that looks excellent at year ten from cashmere that looks tired at year two is not the absence of pilling. It is the consistent, skilled removal of pills as they form.
The skill is genuinely simple. A cashmere comb or fabric shaver used correctly takes five minutes per garment and restores the surface to a clean, refined finish that is almost indistinguishable from new. Done regularly every few wears, before the pills accumulate, the process is quick, satisfying, and completely effective. Neglected for months, accumulated pilling is harder to address and takes longer to restore, but the underlying garment is almost always recoverable with the right approach.
This guide covers the complete removal protocol for both tools: the cashmere comb for regular maintenance and the fabric shaver for heavier work, in step-by-step detail. It covers the preparation that makes removal safer and more effective, the zone-by-zone approach for a full garment, how to maintain your tools, and how to assess the result. It does not cover why cashmere pills, the pilling lifecycle, or how grade affects pilling; that is covered in full in the companion guide.
The Two Tools: When to Use Each
Two tools cover the full range of pilling removal needs for cashmere. Understanding when each is appropriate saves time and produces better results than using a single tool for every situation.
| Tool | Best For | Not Ideal For | Speed | Precision | Fabric Risk |
|---|---|---|---|---|---|
| Cashmere comb | Regular maintenance; fine-grade pills; settled Phase 2 pilling; delicate construction | Very heavy accumulation; large pills; chunky knitwear where teeth cannot reach | Slow, deliberate strokes | High direct tactile feedback | Very low, designed for fine yarn |
| Fabric shaver | Phase 1 clearing; heavy accumulated pilling; larger pills; chunky knitwear | Very delicate or loosely knit fabrics where mesh guard may catch | Fast, covers large areas quickly | Moderate, requires steady, even pressure | Low with good technique; moderate if pressed too hard |
| Pumice stone / fabric stone | Accessories and flat woven surfaces; persistent pill areas | Knitted sweaters (may snag on knit structure) | Moderate | Low, broad contact area | Moderate, abrasive; test first |
The most effective approach for a complete garment maintenance session: start with the fabric shaver for any heavily pilled areas (particularly the underarm zone and initial wear-in pilling), then finish with the cashmere comb for the remaining areas and for the final refinement pass. This combination is faster than either tool alone for a heavily pilled garment and produces the best surface quality.
Tool Buying Guide
Choosing Your Tools — Complete Buying Guide
The Cashmere Comb — What to Look For
A cashmere comb is a deceptively simple tool. The quality of the result depends almost entirely on the specification of the teeth: their spacing, their gauge, and their surface finish.
- Tooth spacing
- Tooth gauge
- Tooth finish
- Handle
- Specific recommendations
The Fabric Shaver: What to Look For
The fabric shaver (also sold as a lint shaver, bobble remover, or electric pilling remover) consists of a rotating cutting head covered by a mesh guard. Pills enter the mesh apertures and the rotating blade cuts them cleanly. Quality varies significantly: the wrong shaver can snag delicate knit structure or produce an uneven cut surface.
- Mesh aperture size
- Blade sharpness and speed consistency
- Adjustable height guard
- Pill collection chamber
- Specific recommendations
Preparation
Before You Start: Preparation for Best Results
Three minutes of preparation before starting pill removal produces meaningfully better results than going straight to the garment cold. The preparation addresses the three variables that most affect the outcome: garment condition, surface tension, and lighting.
1. The Garment Must Be Clean and Dry
Pilling removal is best performed on a clean, dry garment. Washing before a major pill removal session has two benefits: it softens and loosens the pills slightly (making them easier for the comb teeth to engage with), and it ensures any removal work is done on a stable, moisture-balanced fabric surface.
For a garment that is between washes but has developed surface pilling, light pilling removal is safe and effective on a dry, unwashed garment. For a major session on a heavily pilled garment, a pre-wash and flat dry first produces the best results.
2. Lay the Garment Completely Flat
Pilling removal requires the fabric to be under gentle, even tension: enough to make the surface stable under the comb or shaver, not so much that the fibres are stretched. The correct way to achieve this is to lay the garment completely flat on a firm, smooth surface. A clean table, a firm ironing board, or a clean floor all work well. The surface should be smooth enough that it does not catch on the fabric as you work.
Do not hold the garment in the air or drape it over your hand while working. Without a flat backing surface, the fabric has no resistance to the pressure of the comb or shaver and the results are less controlled. The flat surface provides the resistance that keeps the fabric stable under the tool.
3. Hold the Fabric Taut — The Right Amount
While the garment lies flat on the surface, use the non-working hand to hold the fabric taut in the area being worked on. "Taut" means gently stretched enough to create a flat, stable surface, not pulled to full stretch. The fabric should feel firm and stable under the tool but not look visibly stretched.
Correct tension: press your non-working hand flat against the fabric a few centimetres from the area you are working on. This creates gentle tension across the working area without pulling the fabric out of shape. Move the stabilising hand with you as you progress across the garment.
Caution: over-tensioning the fabric, stretching it significantly while using a fabric shaver, risks the shaver engaging with the stretched knit structure rather than just the surface pills. The mesh guard of a shaver relies on the fabric loops being at their natural, relaxed size to pass the mesh safely. Stretched loops may be large enough to partially enter the mesh apertures.
Cashmere Comb Protocol
The Cashmere Comb — Step-by-Step Protocol
The cashmere comb is the primary tool for settled Phase 2 maintenance pilling on fine cashmere. This protocol covers a full garment maintenance session, from preparation to final check.
Step 1
Assess the Surface [COMB]
Before starting, examine the garment surface in good light. Identify the distribution of pilling where it is heavy (primary friction zones: underarm, elbow, cuff edge), where it is moderate (side body, shoulder area), and where the surface is relatively clear (centre front and back panels). This assessment tells you where to spend most time and in what sequence to work.
Also assess the character of the pilling: are the pills soft and clearly separated from the surface (easy to remove), or are they dense and matted together (will need more deliberate technique)? Heavily matted pilling may benefit from the fabric shaver before finishing with the comb.
Step 2
Set the Comb Angle [COMB]
Positioning — critical.
The angle at which you hold the comb relative to the fabric surface is the single most important variable in comb technique. The correct angle is shallow, approximately 15 to 25 degrees from the fabric surface. At this angle:
- The teeth sweep across the surface: engaging with the pills from the side and lifting them, rather than digging into the fabric and potentially catching on yarn loops.
- The force is predominantly lateral: moving the pill toward the leading edge of the comb rather than pressing it against the fabric.
- The risk of yarn damage is minimised: shallow-angle strokes skim the surface; steep-angle strokes (45+ degrees) press the teeth into the fabric and increase the risk of catching a yarn loop.
Practice the correct angle: hold the comb so the teeth are almost parallel to the fabric surface, with the handle raised slightly. The teeth should touch the fabric lightly; you should barely feel any downward pressure.
Step 3
The Stroke — Direction, Length, and Pressure [COMB]
Core technique.
The cashmere comb stroke is a single, consistent sweep in one direction. The mechanics:
- Direction: always stroke in the same direction; do not stroke back and forth. Choose a direction that feels natural (typically top-to-bottom or left-to-right depending on how you are positioned relative to the garment) and maintain it consistently throughout the session. Directional consistency reduces the risk of the teeth catching on the knit structure from an unexpected angle.
- Stroke length: 6 to 10 centimetres per stroke is ideal, long enough to collect pills efficiently, short enough to maintain controlled pressure throughout the stroke.
- Pressure: light. The comb should feel almost weightless on the fabric. The teeth engage with pills through their geometry (the narrow spacing catches pills) rather than through downward force.
- Speed: slow and deliberate. A stroke taking 2 to 3 seconds over 8 cm is correct. Rapid strokes miss pills and reduce the precision of the technique.
Expert note: the feeling of a correct comb stroke should be a very subtle, slight resistance as the teeth engage with pills, not a catching or dragging sensation, but a barely perceptible "combing" feeling. If you feel a catching sensation at any point, stop immediately. The comb has engaged with a yarn loop. Lift the comb, reposition it just before the catching point, and continue with lighter pressure and a shallower angle. If the catching persists in a specific area, the pills in that area are more firmly attached, switch to the fabric shaver for this zone.
Step 4
Clear the Comb Between Strokes [COMB]
After every 2 to 3 strokes.
After every two to three strokes, the collected pills accumulate between the comb teeth and reduce the effectiveness of subsequent strokes. Clear the comb by:
- Holding the comb teeth-down over a waste surface (a sheet of white paper is useful, you can see the collected pills clearly).
- Using the tip of your finger or a small brush to sweep the collected pills out from between the teeth.
- Alternatively, draw the comb across the edge of a piece of firm card to clear the teeth mechanically.
Keeping the comb clear between strokes maintains consistent effectiveness throughout the session and allows you to see how much pilling you are collecting, useful feedback on how effectively the session is progressing.
Step 5
Work Section by Section [COMB]
Systematic coverage.
Work through the garment systematically in defined sections rather than moving randomly across the surface. A systematic approach ensures complete coverage without double-working areas (which wastes time) or missing sections (which leaves the result uneven).
The recommended zone sequence for a standard cashmere sweater:
- Centre front panel: start here, the flattest, most accessible section and usually the least pilled. Working here first warms up your technique before moving to harder zones.
- Centre back panel: similar to the front; usually light pilling unless the garment is worn under rough-backed chairs or coat linings.
- Left side body (below armhole): moderate pilling zone. Work from shoulder level down to the hem.
- Right side body: mirror of the left.
- Left shoulder and upper back: moderate zone affected by bag straps and coat linings.
- Right shoulder: mirror of the left.
- Left sleeve (outer surface): work from the shoulder seam to the cuff.
- Left sleeve (inner surface, elbow area): the primary friction zone on sleeves, typically the most pilled sleeve area.
- Right sleeve outer and inner: mirrors of the left.
- Underarm area (both sides): the highest-pilling zone on most garments. Give this area extra passes; it accumulates the most pilling and benefits most from thorough removal.
- Collar and neckline: gentle technique here; finer knit structure in many necklines. Extra care with angle and pressure.
- Cuffs: often heavily pilled from contact with desk surfaces, watchstraps, and sleeve linings. Work carefully, given the rib structure.
Step 6
The Final Refinement Pass [COMB]
2 minutes — produces the best finish.
After completing the systematic zone pass, perform a final light refinement pass over the entire garment with the lightest possible pressure. This final pass catches any remaining pills that the main session loosened but did not fully remove, and produces a more even, refined surface than the main pass alone.
The refinement pass is what takes a result from "much better" to "excellent." It takes two to three minutes for a full sweater and is well worth the additional time.
After a correct and complete comb session, the garment surface should look clean, smooth, and matte, the natural texture of well-maintained cashmere. The primary friction zones should look clearly better than before the session started. The improvement should be visible from a short distance, not just under close inspection.
Fabric Shaver Protocol
The Fabric Shaver: Step-by-Step Protocol
The fabric shaver is faster than the comb for heavier pilling and initial Phase 1 clearing sessions. The technique differences from comb use are important; the shaver has a rotating blade that requires a different hand movement and pressure approach.
Step 1
Charge and Check the Shaver [SHAVER]
Before session.
Ensure the shaver is fully charged (or has fresh batteries) before a pilling session. A slow-moving blade from depleted power cuts pills less cleanly, it tears rather than cuts, leaving a short, ragged pill stump rather than a clean cut at the fabric surface. A fully charged shaver operating at full blade speed produces a smooth, clean cut every time.
Step 2
Empty the Collection Chamber and Test on a Hidden Area [SHAVER]
30 seconds.
Before working on the visible garment surfaces, test the shaver on a hidden area, the inside of a seam allowance, a hem turn-up, or the inside back hem of the sweater. Run the shaver across this hidden area at the pressure and speed you intend to use for the main session. The test tells you:
- Whether the mesh is engaging correctly
- Whether the mesh guard is snagging
- Whether the blade speed is adequate
Step 3
The Shaver Stroke — Pressure, Speed, and Movement [SHAVER]
Core technique.
The fabric shaver technique differs from the comb technique in one critical way: the shaver works with almost zero downward pressure, and uses circular or overlapping linear movements rather than single-direction strokes.
- Movement: use slow, overlapping circles (5 to 8 cm) for best results, or overlapping straight lines (50% overlap) on flat areas.
- Speed: move slowly; each 5 cm circle should take 3 to 4 seconds. Fast movement reduces effectiveness.
- Dense areas: slow down or briefly pause on heavily pilled spots (for example, underarms and elbows) and empty the chamber if needed.
Step 4
Empty the Collection Chamber Frequently [SHAVER]
Every 3 to 4 minutes for heavy pilling.
A full collection chamber reduces the suction that draws pills into the cutting head and can cause already-cut pills to redeposit on the fabric surface. Empty the chamber:
- Every 3 to 4 minutes during heavy Phase 1 clearing sessions: the volume of cut material from a first clearing session is surprisingly large and fills the chamber quickly.
- Every 5 to 8 minutes during settled Phase 2 maintenance sessions: lighter pilling generates less material; less frequent emptying is required.
- Whenever the shaver sounds like it is struggling: a reduction in blade sound typically indicates a full chamber. Empty and continue.
Emptying the chamber takes 10 seconds and restores full cutting efficiency. It is one of the most commonly skipped steps by people frustrated with shaver performance, and one of the most effective improvements.
Step 5
Zone Sequence for the Fabric Shaver [SHAVER]
Start with high-density zones.
Unlike the comb, which works well starting from a low-pilling area to warm up the technique, the fabric shaver is most efficiently used starting from the highest-pilling zones, where the volume of work is greatest and where the shaver's speed advantage over the comb is most valuable:
- Underarm areas (both sides): highest pilling density; start here. Expect to empty the chamber once or twice during this zone alone on a Phase 1 garment.
- Inner elbow and cuff areas: second-highest density. Work slowly with extra passes.
- Side body below armhole: moderate pilling. Standard technique.
- Shoulder area: moderate pilling. Standard technique.
- Front and back centre panels: lightest pilling. The shaver may be overkill for these areas on a Phase 2 garment; switch to the comb for these panels during regular maintenance sessions.
- Collar and neckline: use with extra care, finer construction in many necklines. Very light pressure and slow movement. Consider switching to the comb for the neckline area.
Step 6
Finish with the Cashmere Comb [SHAVER → COMB]
Final refinement.
After the fabric shaver session, the surface has been cleared of the bulk of the pilling. A final pass with the cashmere comb refines the result: the comb catches any pill stumps left by the shaver (very short residual pill bases that the shaver cut but did not fully remove), evens out the surface texture, and produces the clean, matte finish that is the hallmark of well-maintained cashmere.
The comb finishing pass after a shaver session takes only two to three minutes for a full sweater and elevates the result from "cleared" to "refined." This two-tool combination, shaver for volume removal and comb for refinement, is the most effective approach for any significantly pilled cashmere garment.
Tool Maintenance
Clean both tools after each use. Keep the comb teeth clear of residue, empty and wipe the shaver chamber, and replace worn blades or damaged mesh guards immediately.
What Never to Use on Cashmere Pilling
Several improvised or non-specialist approaches to pill removal should never be used on cashmere. Each carries a specific risk of damage that ranges from surface disruption to permanent yarn damage.
- Never: scissors or a razor blade to cut pills off. The pill is connected to the underlying yarn by its most recently freed fibres. Cutting the pill with scissors or a razor risks cutting those connecting fibres, which are also yarn fibres, creating a loose end that will unravel. A razor blade offers no control over depth of cut. Even a very skilled use of scissors has a meaningful risk of nicking the underlying yarn.
- Never: sticky lint rollers or adhesive tape for pills (as opposed to surface lint). Lint rollers and tape are designed for loose surface fibres, not attached pills. The adhesive catches on the connected fibres of a pill and pulls, engaging the scale-ratcheting mechanism of protein fibres and potentially pulling more firmly anchored fibres out of the yarn. This can create surface disturbance and, in bad cases, pull yarn loops out of the knit structure.
- Never: a fingernail or bare fingers to pull pills off. The same scale-ratcheting risk as tape. Pulling a pill by hand applies concentrated force to the few fibres connecting it to the yarn, and scale engagement can draw more fibres into the pull, sometimes extracting more yarn than just the pill. Always use a tool.
- Never: Velcro lint removers on cashmere. Velcro's hook-and-loop structure catches very aggressively on fine cashmere fibres and can pull loops of yarn out of the knit structure. Even a single pass of a Velcro surface across fine cashmere can cause significant surface damage.
- Never: a coarse-mesh fabric shaver (designed for fleece) on fine cashmere. The larger mesh apertures of a fleece shaver are sized for the heavier yarn of fleece. On fine cashmere, the mesh engages with yarn loops rather than just pills, and the rotating blade can cut yarn rather than pills.
Frequently Asked Questions: Removing Pilling from Cashmere
Q: I used my fabric shaver and now there's a small hole in my cashmere, what happened?
A hole created by a fabric shaver is almost always caused by one of three things: the mesh guard was damaged (deformed or holed) and the blade made direct contact with the yarn; the guard was pressed too firmly against the fabric, allowing a yarn loop to enter the mesh apertures; or the shaver was used on a very loosely knit fabric where the knit structure itself was loose enough that yarn loops were available to the blade regardless of mesh aperture size. Check the mesh guard immediately; if it is damaged, replace it before using the shaver again. For the hole itself: if it is a clean cut with no unravelling, a skilled knitwear mender can repair it. For future sessions, reduce pressure and check the mesh guard condition before each use.
Q: After combing, the garment looks worse, the surface is fuzzy rather than smooth. What went wrong?
Fuzzing after combing is caused by one of two technique errors: the comb angle was too steep (close to perpendicular rather than the correct shallow 15 to 25 degrees), which presses the teeth into the fabric and raises surface fibres rather than collecting pills; or the comb pressure was too heavy, again pressing teeth into the fabric. The fuzzing is typically temporary; allow the garment to rest for 24 hours, and most of the raised fibres will lie flat again. For the next session, consciously maintain the shallow angle and very light pressure. If fuzz continues to be a problem with the comb, switch to a fabric shaver for this garment, some loosely knit cashmere responds better to the shaver's approach than the comb.
Q: Can I remove pilling from a dry-clean-only cashmere garment?
Yes, pilling removal with a comb or shaver does not involve any moisture, heat, or chemical process. It is a purely mechanical surface treatment that is safe regardless of the garment's washing instructions. The "dry clean only" instruction applies to wet cleaning, not to mechanical maintenance. Comb and shave as normal. The dry cleaning instruction is not relevant.
Q: My cashmere comb doesn't seem to be doing anything, the pills are not coming off. What's wrong?
The most common cause is that the comb angle is too steep, pressing teeth into the fabric rather than sweeping them across the surface. Try holding the comb much more parallel to the fabric, almost horizontal, and check whether you can feel the teeth engaging with pills in the stroke. The second possibility is that the teeth are full of previously collected fibres and no longer have space to collect more. Clear the comb teeth and try again. The third possibility is that the pills are too large or too firmly attached for the comb. Use the fabric shaver for the initial clearing pass, then finish with the comb.
Q: How do I know when I have removed enough pilling for the session?
The target is a visually clean, smooth, matte surface across all worked areas, not necessarily a "brand new" appearance, but a refined surface free of visible bobbles. The practical test: step back from the garment and look at it from a metre away in good light. If you can see any surface texture that looks like clusters of bobbles remaining, continue working. If the surface looks smooth and even from that distance, the session has achieved its goal. On a Phase 2 maintenance session, reaching this result typically takes 5 to 8 minutes. On a recovery session for a heavily pilled garment, it may take 20 to 30 minutes, and perfection on the first session is not always achievable; a second session a week later often achieves the final refinement that the first session could not.
Q: Is there a difference in technique for pilling on cashmere scarves vs sweaters?
Yes, primarily in the support-surface approach. A cashmere scarf or wrap is a flat, two-dimensional piece that lays on a surface differently from a shaped knitted sweater. For scarves: lay completely flat on the work surface, weighted at the corners if it tends to move. Work in long, consistent strokes from one end to the other rather than the zone-by-zone approach used for sweaters. A pumice fabric stone (used with light circular pressure) is often more effective on flat woven cashmere scarves than a comb, as it covers the flat surface more efficiently. For open-knit scarves (visible holes in the weave structure), use the comb only; a fabric shaver will engage with the open weave gaps and cannot be used safely.
Q: My garment has pilling on the inside as well as the outside, should I comb both sides?
Yes, but prioritise the outside. Inside pilling is cosmetically invisible and structurally harmless, it does not affect the appearance of the garment when worn. The outside surface is what matters visually. If you wash the garment inside-out (which is recommended to protect the outer surface during washing), you will find that the inside surface develops some pilling too; this is normal and can be addressed when you address the outside. Comb the outside first; comb the inside if you notice it has become significantly pilled.
Q: Is it better to remove pilling before or after washing?
Both approaches work, and experienced owners differ on preference. Arguments for removing before washing: the pills are in their developed state and easy to identify; removing them before washing means the wash water is not discoloured by released pill fibres. Arguments for removing after washing: washing slightly loosens matted pills, making them easier for comb teeth to engage with; the garment is in its flattest, most relaxed state after flat drying, giving the best surface stability for comb work. For regular Phase 2 maintenance, either approach works well. For a recovery session on a heavily pilled garment, washing first and removing after drying produces the best results.
Five Minutes That Make Decades of Difference
Pilling removal is the most visually immediate care task in cashmere maintenance, the transformation from a pilled surface to a clean, refined one is visible in real time and takes only minutes. It is also the task that most distinctly separates cashmere that ages well from cashmere that ages poorly.
The tools cost less than a meal out. The technique takes a single session to learn properly. The habit, once established, takes five minutes every few wears and produces a garment that looks its best every time it is worn. After ten or fifteen years of this practice, the reward is exactly what quality cashmere promises: a piece that has softened and refined with careful use, maintains its original dimensions and character, and looks more distinguished than it did when new.
That is the return on five minutes, consistently invested.